Shift Scheduler Spreadsheet (Staff Scheduling)
This section describes the different worksheets of the Shift Scheduler spreadsheet in details. If you recall from the previous section, only the following worksheets require user inputs or updates:- General Inputs Worksheet
- Shift Patterns Worksheet
- Employee Rotation Worksheet
- Adjusted Schedule Worksheet
Inputs worksheet
This worksheet lets you specify the Stat Date of the shift schedule, the Names of the employees, the Names of the shifts, the Start/Stop time of the shifts and the number of hours of each shift. A maximum of 25 employees and 6 types of shifts are supported.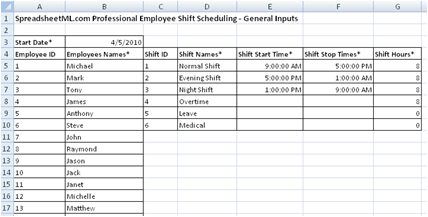
This shift information from cell C4 to G10 can be printed. The start and stop shift time is actually not used by other parts of the spreadsheet. It is only used to maintain a consistent understanding of the shift hours.
Shift Patterns worksheet
This is the worksheet that lets you specify the shift patterns. The portion highlighted in red requires your inputs. You can copy the shift patterns from the Shift Patterns spreadsheet to schedule the employees.The letter "x" is used to specify days off while numbers 1 to 6 indicate shift numbers. The advantage of using Excel for shift scheduling can be easily seen here. For example, you can select a group of cells and change the shift number from 1 to 2 by using the Excel replace function. The Num Shifts field shows the number of shifts to be worked on for that specific week (Leg).
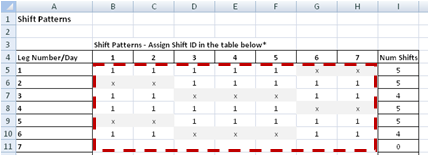
A summary of the total number of employees on each type of shift is provided in a table as shown below. The table shows 4 employees working on Shift 1 throughout the week. This table is helpful when you need to customize the shift patterns.
Employee Rotation worksheet
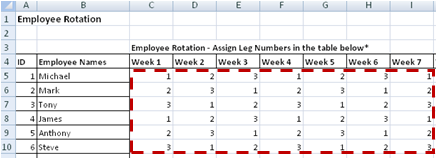
This worksheet is used for assigning employees to the different Legs specified in the Shift Patterns worksheet. The portion highlighted in red requires your inputs.In the diagram below, the employee Michael is working on Leg 1 on Week 1 and Leg 2 on Week 2 and so on. To assign employees to just one specific Leg, simply assign a single Leg number. For example, assigning Michael to Leg 1 on all the weeks will simply assign him to work on Leg 1 throughout the schedule.
A maximum of 25 weeks can be assigned, after which, a new schedule will need to be generated. This allows weekly, monthly, bi-monthly, quarterly and half-yearly schedules to be generated. We encourage using a schedule that is shorter than a yearly schedule to keep the schedule simple to maintain and be able to react to changes quickly and flexibly. It is also important not to use a schedule that is too short as employees need time to adjust to the new schedule.
Initial Schedule worksheet
Upon entering the information for the first three worksheets mentioned above, an initial schedule will be generated in this worksheet. This is a monthly calendar (up to 25 weeks) that shows the assignments of Legs of all the employees. The worksheet can be printed on an A4 paper in Landscape mode. This schedule can be submitted for management approval. It can also be used to solicit feedbacks from the employees.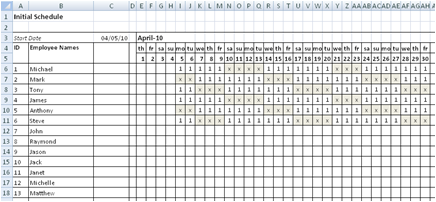
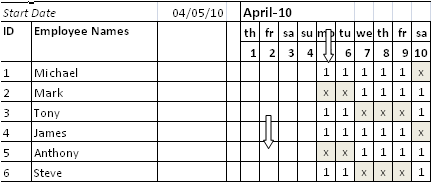
The first arrow in the diagram below shows the shift numbers (ID). The shift numbers (ID) is defined in the General Inputs worksheet and assigned in the Shift Patterns and Employee Rotation worksheet. A letter "x" indicates an off day. An empty space as shown by the second arrow indicates that the specified date is not part of the shift scheduling period.
Adjusted Schedule worksheet
This is the worksheet used for handling swapping of shifts among the employees and overtime clocked by employees for covering absentees.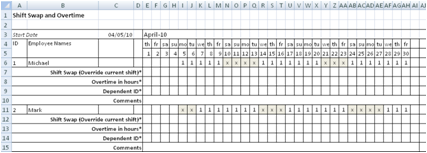
The rows in bold as shown in the diagram below allows shift swapping and overtime information to be entered. The Dependent ID is used when an employee works overtime. For example, you enter Employee ID 2 into the Dependent ID cell if there is overtime incurred for covering Employee ID 2 who is absent. The Comments field is an open ended field for entering Shift Swap or Overtime comments or other information.
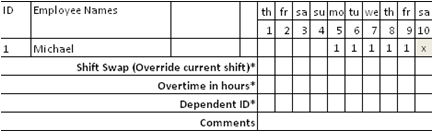
Shift Swap
A drop-down list will automatically appear when a cell in the Shift Swap row is selected. Any shift numbers (ID) defined in the General Inputs worksheet can be selected.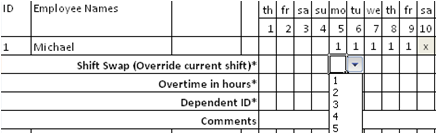
The new shift selected will override the existing shift previously scheduled for the employee. This is shown in the diagram below. Typically, if two employees swap shifts, the Shift Swap rows for both the employees will be changed.

Overtime
The Overtime field is best explained using an example as shown in the diagram below. The first arrow in the diagram below shows Employee ID 1 absent on Monday. The second arrow shows Employee ID 2 working overtime for 4 hours to cover the absent employee. The Dependent ID shows the ID of the absent employee. And in this case, another employee is required to work overtime for another 4 hours to fully cover the absent employee.
The overtime information will be summarized and consolidated in the Overtime and Overtime Summary worksheets.
Final Schedule worksheet
This worksheet shows the final schedule after the shift swaps among the different employees to show the actual shift work carried out by the employees. This format is exactly the same as the Initial Schedule. The worksheet can be printed on A4 paper using Landscape mode easily.
Shift Summary worksheet
The Shift Summary worksheet calculates and sums the number of employees working on the different shifts. You can use this worksheet to see if specific requirement like minimum number of employees per shift is met. In the diagram below, it shows 4 employees are working on the Normal Shift from the 5th of April to 30th April. If the minimum number of employees on the Normal Shift is 4 and in some of the days it is below 4, you can investigate the cause by looking at the Adjusted Schedule worksheet.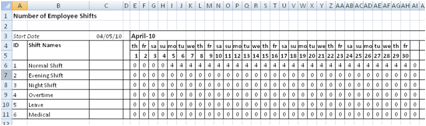
Overtime worksheet
This worksheet summarizes the number of overtime hours clocked by the employees each day throughout the schedule period. The total number of overtime hours per month per employee is also provided.
Overtime Summary worksheet
The Overtime Summary worksheet provides overtime hours clocked by the employees in a monthly total format. This is useful for calculating the overtime pay and for keeping track of employees working overtime.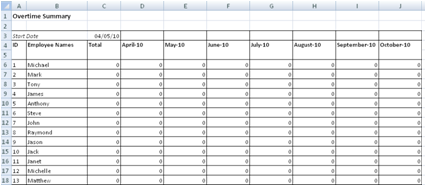
Individual Schedule worksheet
The Initial Schedule and Final Schedule show the shift schedules of all employees in one single table. This is useful for the supervisors to see who works on which shift.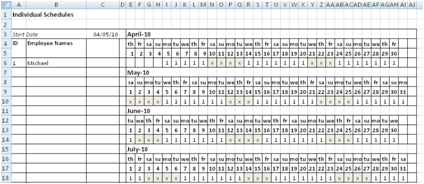
Employees, on the other hand, may prefer their own personal shift schedule. This worksheet contains the individual schedule of each employee. The schedule can be printed on A4 paper in Landscape mode easily.
The individual schedule for the employee Michael is as shown below.
Back to Shift Scheduler Spreadsheet main page.